Learning how to food photography can transform simple meals into stunning visual stories. Great food photography makes viewers hungry, curious, and eager to try a dish. It blends technical skill with creative vision.
This guide covers the essentials every beginner needs. Readers will learn about equipment, lighting, composition, camera settings, and editing. Each section builds practical knowledge for capturing professional-quality food images. Whether someone wants to grow a food blog or improve their Instagram feed, these food photography techniques deliver real results.
Table of Contents
ToggleKey Takeaways
- Learning how to food photography starts with basic equipment—a 50mm lens, tripod, and simple reflectors can produce professional results without breaking the bank.
- Natural window light is the most accessible lighting option; position dishes near large windows and use diffusers to soften harsh shadows.
- Master composition by using the rule of thirds, choosing the right angle for each dish, and leaving negative space to let your food photography breathe.
- Shoot in manual mode with aperture between f/2.8 and f/5.6, keep ISO low, and always capture images in RAW format for maximum editing flexibility.
- Style food with fresh ingredients, complementary colors, and neutral backgrounds to make dishes visually pop in your photos.
- Use Adobe Lightroom to fine-tune exposure, white balance, and color saturation for polished, share-worthy food photography results.
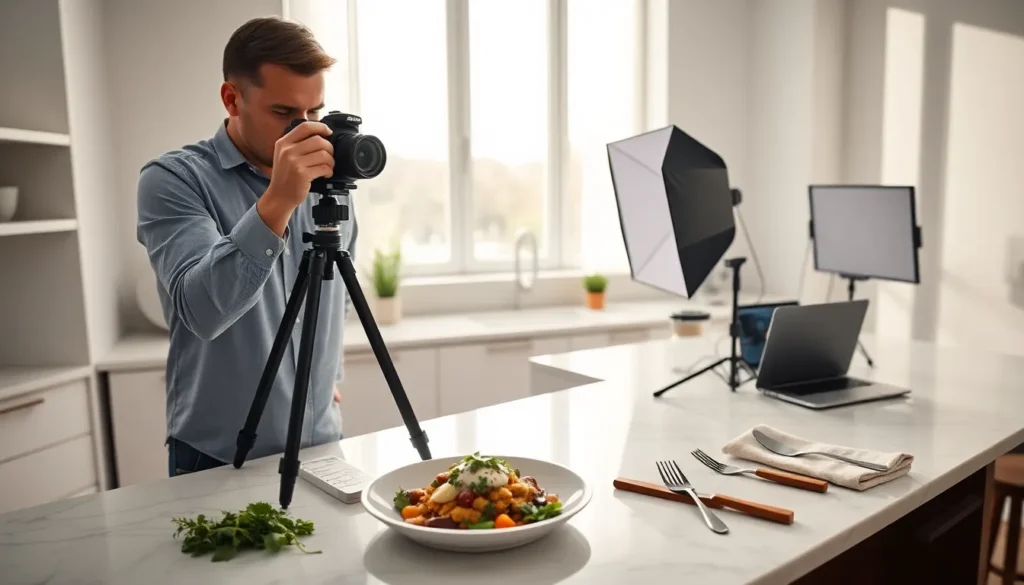
Essential Equipment for Food Photography
Good food photography starts with the right tools. Beginners don’t need expensive gear to capture beautiful images. A few key pieces make a significant difference.
Camera Options
A DSLR or mirrorless camera offers the most control for food photography. These cameras allow manual adjustments to aperture, shutter speed, and ISO. But, modern smartphones also produce impressive results. The iPhone 15 Pro and Samsung Galaxy S24 Ultra feature advanced camera systems suitable for beginners.
Lenses That Work Best
A 50mm prime lens is ideal for food photography. It creates natural perspective without distortion. A macro lens (85mm or 100mm) captures small details like texture and garnishes. These lenses produce shallow depth of field, which blurs backgrounds and highlights the subject.
Tripods and Stabilization
A sturdy tripod eliminates camera shake. It allows photographers to shoot at slower shutter speeds in low light. A tripod also frees both hands for styling adjustments during food photography sessions.
Reflectors and Diffusers
White foam boards cost under $5 and bounce light onto shadowed areas. Black boards absorb light and add contrast. A simple diffuser, even a white bedsheet, softens harsh sunlight through windows.
Mastering Natural and Artificial Lighting
Lighting defines the mood and quality of food photography. It separates amateur snapshots from professional images.
Natural Light Techniques
Window light remains the most accessible option for food photography. Position the dish near a large window during morning or late afternoon. Side lighting creates depth and dimension. Backlighting makes translucent foods like drinks and salads glow beautifully.
Avoid direct sunlight, it creates harsh shadows and hot spots. Use a sheer curtain or diffuser to soften intense rays. Overcast days provide naturally diffused light that flatters most dishes.
Artificial Light Setup
Continuous LED panels give beginners consistent, controllable light for food photography. A single softbox positioned at 45 degrees mimics natural window light. Two-light setups add fill light to reduce shadows.
Speedlights offer more power but require modifiers. Shoot-through umbrellas and softboxes spread light evenly across the scene. Color temperature matters, set lights to 5500K for daylight-balanced results.
Common Lighting Mistakes
Mixed lighting sources create color casts that are difficult to correct. Turn off overhead room lights when using natural light. Flash directly on food flattens texture and looks unnatural. Always diffuse or bounce artificial light for food photography.
Composition and Styling Techniques
Strong composition guides the viewer’s eye and creates visual interest. Food styling transforms ordinary plates into photogenic scenes.
Composition Rules
The rule of thirds places the main subject off-center for dynamic images. Imagine a 3×3 grid over the frame and position key elements at intersection points. Leading lines, utensils, napkins, or table edges, direct attention toward the food.
Negative space gives images breathing room. Don’t overcrowd the frame with props. Odd numbers of elements (three cookies, five strawberries) appear more natural than even groupings in food photography.
Angles That Work
Overhead (flat lay) shots suit pizzas, salads, and plated arrangements. This angle shows the entire scene and works well on social media. A 45-degree angle mimics how diners view their plates and suits most dishes.
Straight-on shots highlight height, think layered cakes, stacked pancakes, and tall burgers. Each food photography angle tells a different story.
Styling Tips
Fresh ingredients photograph better than wilted ones. Mist vegetables with water for a fresh look. Undercook pasta slightly to prevent mushiness during long shoots.
Props add context without stealing focus. Choose neutral backgrounds, marble, wood, or linen. Complementary colors make food pop. A blue backdrop enhances orange foods: green herbs brighten red sauces. These food photography styling choices separate good images from great ones.
Camera Settings and Editing Tips
Proper camera settings capture sharp, well-exposed images. Post-processing polishes the final result.
Optimal Camera Settings
Shoot in manual mode for complete control over food photography results. Set aperture between f/2.8 and f/5.6 for pleasing background blur while keeping the subject sharp. Wider apertures (f/1.8) create dreamy bokeh but may leave parts of the food out of focus.
Keep ISO as low as possible, 100 to 400 in good light. Higher ISO introduces noise that degrades image quality. Shutter speed varies based on available light: a tripod allows slower speeds without blur.
Always shoot in RAW format. RAW files retain more data for editing than JPEGs. They allow greater adjustments to exposure and white balance during post-processing.
White Balance Matters
Correct white balance ensures food colors appear accurate. Auto white balance often skews warm or cool. Set a custom white balance using a gray card, or adjust during editing. Food photography demands accurate color, viewers expect chicken to look golden, not orange.
Editing Workflow
Adobe Lightroom handles most food photography editing needs. Start with exposure and white balance corrections. Increase contrast slightly to add punch. Adjust highlights and shadows to recover detail.
The HSL panel fine-tunes individual colors. Boost orange saturation to make skin on roasted meats pop. Reduce green luminance to deepen leafy vegetables.
Sharpening adds crispness to textures. Apply selectively to avoid noise amplification. A subtle vignette draws attention toward the center of the image. Export at appropriate resolution for the intended platform.