
Food photography transforms ordinary meals into visual stories that make viewers hungry. Whether someone shoots for a restaurant menu, a food blog, or social media, the right techniques separate amateur snapshots from professional-quality images. This guide covers the essential elements of food photography, from lighting and styling to equipment and editing. These practical tips help photographers at any skill level capture dishes that look as delicious as they taste.
Table of Contents
ToggleKey Takeaways
- Natural side lighting at a 45 to 90-degree angle is the most effective technique for revealing texture in food photography.
- Style dishes with fresh ingredients, slight undercooking, and strategic garnishes to create appetizing, professional-looking images.
- A 50mm prime lens with a wide aperture (f/1.8 or f/1.4) is the essential workhorse lens for stunning food photography.
- Apply the rule of thirds and use odd-numbered groupings to create dynamic, visually balanced compositions.
- Warm white balance (5500-6500K) and careful color correction make food look more appetizing in post-processing.
- Develop consistent editing presets to build brand recognition and streamline your food photography workflow.
Understanding Lighting for Food Photos
Light makes or breaks food photography. The best food photographers treat lighting as their most important tool.
Natural Light Works Best
Natural light creates soft, appetizing images. Position the food near a large window during the morning or late afternoon. This produces diffused, even lighting that highlights textures without harsh shadows.
Direct sunlight causes problems. It creates bright spots and deep shadows that distract from the food. A white curtain or diffusion panel softens strong sunlight effectively.
Direction Matters
Side lighting reveals texture in food photography. It shows the layers of a cake, the crispy edges of fried chicken, or the steam rising from soup. Position the light source at a 45 to 90-degree angle from the dish.
Backlighting creates drama. Light coming from behind the food produces a luminous quality, especially for drinks and translucent foods like salads. This technique requires a reflector in front to bounce light back onto the dish.
Front lighting flattens food. Avoid placing the main light source directly behind the camera. This eliminates shadows and makes dishes look two-dimensional.
Artificial Lighting Options
When natural light isn’t available, continuous LED panels or softboxes work well for food photography. They let photographers see exactly how light falls on the dish before shooting. A 5500K color temperature mimics daylight and keeps food colors accurate.
Flash photography requires practice. The burst of light can look harsh, but modifiers like softboxes and umbrellas create softer results.
Styling and Composition Techniques
Great food photography relies on thoughtful styling and composition. These elements draw the viewer’s eye to the dish.
Food Styling Basics
Fresh ingredients photograph better. Wilted lettuce and droopy herbs look unappetizing. Prepare extra ingredients and swap in fresh pieces as needed during the shoot.
Undercook food slightly. Pasta and vegetables look better when they retain their color and shape. Fully cooked food often appears mushy in food photography.
Add texture and height. Stack pancakes, layer ingredients visibly, and use garnishes strategically. Height creates visual interest and gives the image depth.
Oil and water help. A light brush of oil makes meat and vegetables glisten. A spray bottle adds fresh-looking water droplets to fruits and cold drinks.
Composition Rules
The rule of thirds guides effective food photography. Place the main dish at one of the intersecting points rather than dead center. This creates a more dynamic image.
Negative space matters. Don’t crowd the frame with props. Empty areas let the food stand out and give the image breathing room.
Odd numbers work. Three cookies look better than two or four. Groups of one, three, or five create natural visual balance.
Props and Backgrounds
Choose props that complement without competing. Neutral plates, textured linens, and wooden surfaces support the food without stealing attention. Avoid busy patterns that distract from the dish.
Backgrounds set the mood. Dark, moody backgrounds suit comfort foods. Bright, airy backgrounds work for fresh salads and desserts. Keep 2-3 versatile backgrounds on hand for food photography sessions.
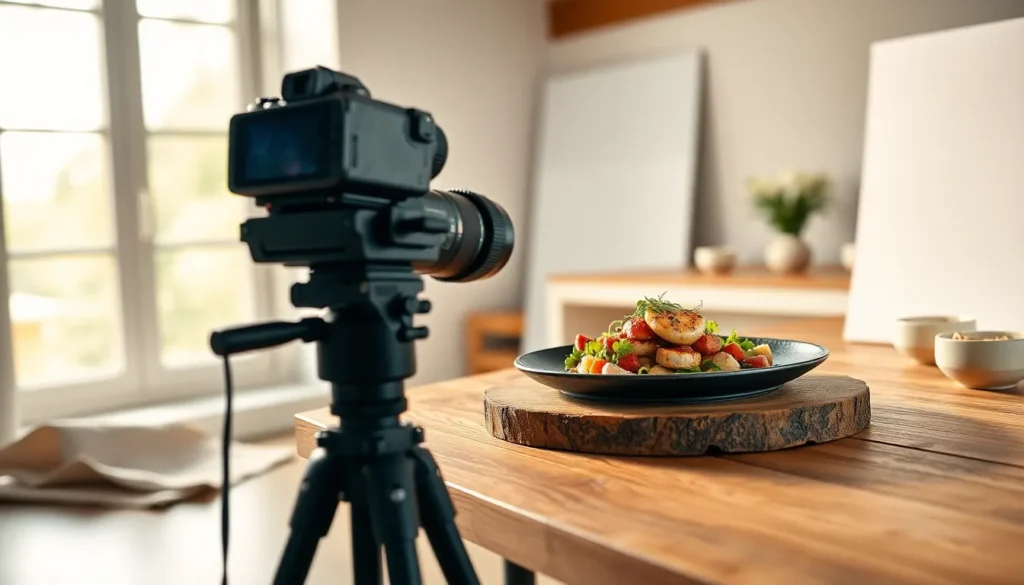
Choosing the Right Equipment
Quality food photography doesn’t require the most expensive gear. The right tools depend on skill level and goals.
Camera Options
DSLR and mirrorless cameras offer the most control. They allow manual settings for aperture, shutter speed, and ISO. Full-frame sensors perform better in low light, but crop-sensor cameras produce excellent food photography results too.
Smartphones work for beginners and social media content. Modern phone cameras have impressive capabilities. They’re perfect for learning composition and lighting basics before investing in dedicated equipment.
Essential Lenses
A 50mm prime lens is the workhorse of food photography. It produces natural-looking images with minimal distortion. The wide aperture (f/1.8 or f/1.4) creates beautiful background blur.
Macro lenses capture extreme close-ups. They reveal details like sugar crystals, water droplets, and food textures that standard lenses miss.
A 35mm lens works well for overhead shots. It captures more of the scene without the distortion of wider lenses.
Helpful Accessories
A sturdy tripod enables sharp images in low light. It also frees both hands for food styling adjustments during the shoot.
Reflectors bounce light into shadows. White foam boards cost a few dollars and dramatically improve food photography lighting.
A remote shutter release prevents camera shake. This small investment makes a noticeable difference in image sharpness.
Editing and Post-Processing Basics
Editing completes the food photography process. Even well-shot images benefit from adjustments.
Software Choices
Adobe Lightroom handles most food photography editing needs. It offers non-destructive adjustments, batch processing, and excellent organization tools.
Photoshop tackles complex retouching. Removing crumbs, fixing imperfections, and compositing multiple images require its advanced features.
Free alternatives exist. Capture One, Darktable, and Snapseed provide capable editing without subscription costs.
Essential Adjustments
White balance affects how appetizing food looks. Warm tones (around 5500-6500K) make most dishes more appealing. Cool tones work for certain foods like seafood and ice cream.
Exposure and contrast bring images to life. Slightly brightening food photography images often improves their appeal. Add contrast to make colors pop.
Clarity and sharpening enhance texture. Apply these carefully, too much makes food look artificial.
Color Correction
Adjust individual colors to make food look accurate. Greens should appear fresh, not neon. Reds in tomatoes and meat need to look natural, not oversaturated.
Skin-tone adjustments matter when hands appear in food photography shots. The HSL panel in Lightroom allows precise control over specific colors.
Developing a Consistent Style
Create presets for efficiency. A consistent editing style builds brand recognition for food bloggers and professional photographers. Save adjustments as presets and refine them over time.